Programming a ray tracer in CUDA Part 1
Programming a ray tracer is a classic exercise to learn both GPU programming and the fundamentals of light simulation. It only requires some knowledge of C++ and basic linear algebra, so it is a great entry point into CUDA graphics programming.
For those who do not know Ray Tracing or CUDA
If you are new to ray tracing, this section explains the basics to get going with the idea and provides examples in CUDA. If you have never coded in CUDA, don't worry, this post will introduce you to the language as well.
Ray tracing
Ray tracing is a rendering algorithm primarily designed around the idea of simulating light paths through a virtual scene. By running this simulation the algorithm can determine the full path of each light particle, the parts of the scene it collides with, its bounces, its color contribution, and much more.
The simulation is typically achieved by shooting multiple photons from the virtual camera into the world, computing the path and determining the correct color contribution for each photon to the final image. The simulation runs backwards: our photon travels from the observer's eye and sinks into any light source in the scene. We can do this because the path of the particle is the same regardless of which direction we cast the ray, and by doing it this way we make sure not to waste any computing time on light paths that never reach our camera.
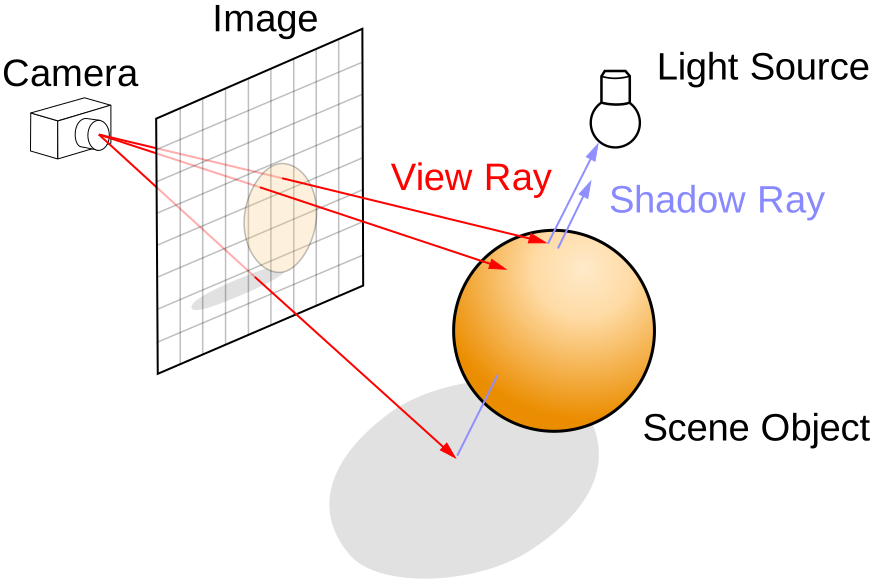
Most of the computational cost of this algorithm comes from finding the path of each particle and calculating its intersection with the scene geometry.
Here's an example of the result:
As you can see, we can accomplish effects that would not otherwise be possible with regular rasterization, such as:
- Real depth of field
- Accurate reflections between objects
- Soft shadows from area lights
CUDA
CUDA is a technology developed by NVIDIA that lets us write code inside a C++ application that targets the GPU (device) from the CPU (host). The CUDA runtime takes care of sending compiled code to the GPU and handling all synchronization, so in practice we can call a function that runs on the GPU almost like any other regular function.
A typical CUDA entry point function (called a kernel) looks like this:
#include <stdio.h>

__global__
void saxpy(int n, float a, float *x, float *y)
{
  int i = blockIdx.x*blockDim.x + threadIdx.x;
  if (i < n) y[i] = a*x[i] + y[i];
}

int main(void)
{
  int N = 1<<20;
  float *x, *y, *d_x, *d_y;
  x = (float*)malloc(N*sizeof(float));
  y = (float*)malloc(N*sizeof(float));

  cudaMalloc(&d_x, N*sizeof(float));
  cudaMalloc(&d_y, N*sizeof(float));

  for (int i = 0; i < N; i++) {
    x[i] = 1.0f;
    y[i] = 2.0f;
  }

  cudaMemcpy(d_x, x, N*sizeof(float), cudaMemcpyHostToDevice);
  cudaMemcpy(d_y, y, N*sizeof(float), cudaMemcpyHostToDevice);

  // Perform SAXPY on 1M elements
  saxpy<<<(N+255)/256, 256>>>(N, 2.0f, d_x, d_y);

  cudaMemcpy(y, d_y, N*sizeof(float), cudaMemcpyDeviceToHost);

  float maxError = 0.0f;
  for (int i = 0; i < N; i++)
    maxError = max(maxError, abs(y[i]-4.0f));
  printf("Max error: %f\n", maxError);

  cudaFree(d_x);
  cudaFree(d_y);
  free(x);
  free(y);
}
We save this file as main.cu (notice the .cu extension) and compile it with nvcc (the NVIDIA CUDA compiler):
nvcc main.cu -o main
./main
Program structure and scene skeleton
First, let me describe in simple terms what our program will do. It creates all the data structures needed to represent the desired scene (models, textures, and materials), uploads them to the GPU, triggers the rendering operation, downloads the generated image back to CPU memory, and writes it to disk.
The top-level structure looks like this:
struct SceneDesc { ... };

struct Scene {
    SceneDesc desc;
    Scene(SceneDesc _desc);

    void upload();
    void uploadFrame();
    void run();
    void download();
    void write(const std::string& path);

    virtual void init() { }
    virtual void step(float deltaTime) { };

    void runPathTracing(const std::string& path) {
        init();
        upload();
        for(int frame = 0; frame < desc.numFrames; frame++) {
            step(0.1f);
            uploadFrame();
            run();
            download();
            write(moviePath(path, frame));
        }
    }

    void addMesh(Mesh mesh);
    void addMaterial(Material material);
    void addTexture(Texture texture);

    struct Constants {
        Camera camera;
    };

    Constants& getConstants();
};
Then in our program we only need to subclass Scene to set up the scene and animations:
struct ExampleScene : public Scene {
    virtual void init() override {
        // call addMesh and addMaterials....
    }

    virtual void step(float deltaTime) override {
        // move camera, set up lights, etc.
    }
};

int main() {
    ExampleScene scene(defaultSceneDesc);
    scene.runPathTracing("result");
}
Core data structures
Now let's get into the details. The first thing we need are the core math and geometry types. In CUDA we get a set of vector types for free (float2, float3, float4, etc.) but we usually want to wrap them with useful operations.
Vectors and rays
struct vec3 {
    float x, y, z;

    __host__ __device__ vec3(float x = 0, float y = 0, float z = 0)
        : x(x), y(y), z(z) {}

    __host__ __device__ vec3 operator+(const vec3& b) const { return {x+b.x, y+b.y, z+b.z}; }
    __host__ __device__ vec3 operator-(const vec3& b) const { return {x-b.x, y-b.y, z-b.z}; }
    __host__ __device__ vec3 operator*(float t)        const { return {x*t,   y*t,   z*t};   }
    __host__ __device__ vec3 operator*(const vec3& b)  const { return {x*b.x, y*b.y, z*b.z}; }

    __host__ __device__ float dot(const vec3& b) const { return x*b.x + y*b.y + z*b.z; }
    __host__ __device__ float length() const { return sqrtf(dot(*this)); }
    __host__ __device__ vec3 normalized() const { float l = length(); return {x/l, y/l, z/l}; }
};

struct Ray {
    vec3 origin;
    vec3 direction;

    __host__ __device__ vec3 at(float t) const { return origin + direction * t; }
};
Note the __host__ __device__ qualifiers. These tell the CUDA compiler to compile the function for both the CPU and the GPU, so we can use the same types on both sides without duplicating code.
Camera
The camera is responsible for generating a ray for each pixel. We define it by its position, a target it looks at, and an up vector:
struct Camera {
    vec3 origin;
    vec3 lower_left;
    vec3 horizontal;
    vec3 vertical;

    __host__ Camera(vec3 from, vec3 at, vec3 up, float vfov, float aspect) {
        float theta = vfov * M_PI / 180.0f;
        float half_height = tanf(theta / 2.0f);
        float half_width  = aspect * half_height;

        vec3 w = (from - at).normalized();
        vec3 u = up.cross(w).normalized();
        vec3 v = w.cross(u);

        origin     = from;
        lower_left = from - u*half_width - v*half_height - w;
        horizontal = u * (2.0f * half_width);
        vertical   = v * (2.0f * half_height);
    }

    __device__ Ray get_ray(float s, float t) const {
        return { origin, (lower_left + horizontal*s + vertical*t - origin).normalized() };
    }
};
Sphere intersection
To keep this first post focused, we'll start with a scene made entirely of spheres. A sphere can be described by its center and radius, and intersecting a ray with it is one of the simplest intersection tests we have:
struct Sphere {
    vec3 center;
    float radius;
    int material_id;
};

__device__ bool sphere_intersect(const Sphere& s, const Ray& ray, float t_min, float t_max, float& t_hit) {
    vec3 oc = ray.origin - s.center;
    float a = ray.direction.dot(ray.direction);
    float b = oc.dot(ray.direction);
    float c = oc.dot(oc) - s.radius * s.radius;
    float discriminant = b*b - a*c;

    if (discriminant < 0.0f) return false;

    float sqrtd = sqrtf(discriminant);
    float root = (-b - sqrtd) / a;
    if (root < t_min || root > t_max) {
        root = (-b + sqrtd) / a;
        if (root < t_min || root > t_max)
            return false;
    }

    t_hit = root;
    return true;
}
The math here comes from substituting the ray equation P(t) = origin + t * direction into the implicit sphere equation |P - center|^2 = radius^2 and solving for t. The discriminant tells us whether the ray actually hits the sphere (negative means no intersection).
The rendering kernel
Now we have everything we need to write the kernel that produces the image. For each pixel, we generate a ray from the camera and check it against all spheres in the scene:
__global__ void render_kernel(
    uint8_t* framebuffer,
    int width, int height,
    Camera camera,
    Sphere* spheres, int num_spheres)
{
    int x = threadIdx.x + blockIdx.x * blockDim.x;
    int y = threadIdx.y + blockIdx.y * blockDim.y;
    if (x >= width || y >= height) return;

    float u = float(x) / float(width);
    float v = float(y) / float(height);

    Ray ray = camera.get_ray(u, v);

    // Find the closest sphere intersection
    float t_min = 0.001f;
    float t_closest = 1e30f;
    int   hit_id    = -1;

    for (int i = 0; i < num_spheres; i++) {
        float t;
        if (sphere_intersect(spheres[i], ray, t_min, t_closest, t)) {
            t_closest = t;
            hit_id    = i;
        }
    }

    vec3 color;
    if (hit_id >= 0) {
        // Shade using the surface normal as color (a classic debug view)
        vec3 hit_point = ray.at(t_closest);
        vec3 normal    = (hit_point - spheres[hit_id].center).normalized();
        color = (normal + vec3(1,1,1)) * 0.5f; // remap from [-1,1] to [0,1]
    } else {
        // Sky gradient
        float t = 0.5f * (ray.direction.y + 1.0f);
        color = vec3(1,1,1) * (1.0f - t) + vec3(0.5f, 0.7f, 1.0f) * t;
    }

    int idx = (y * width + x) * 3;
    framebuffer[idx + 0] = uint8_t(color.x * 255.99f);
    framebuffer[idx + 1] = uint8_t(color.y * 255.99f);
    framebuffer[idx + 2] = uint8_t(color.z * 255.99f);
}
And launching it from the CPU side:
void Scene::run() {
    int tile = 8;
    dim3 blocks(width / tile, height / tile);
    dim3 threads(tile, tile);

    render_kernel<<<blocks, threads>>>(fbo_d, width, height, camera, d_spheres, num_spheres);
    cudaDeviceSynchronize(); // wait for GPU to finish
}
What's next
This gives us a working ray tracer that can render a scene of spheres with normal-shading. In the next part we will look at how to structure the full CUDA program, handle the framebuffer properly, and then start adding real materials (diffuse and specular) to make the images look more interesting.